Friday, April 25, 2014
TIP - ROS Archlinux - python3 vs python2 conflict
python-empy for python 3 breaks the catkin build system. tmp fix: clean the build directory and remove python-empy for python 3
Sunday, May 26, 2013
Outline in Unity with mesh transparency.
Here I found a shader for Unity to obtain an outline of a mesh.
http://answers.unity3d.com/questions/141229/making-a-silhouette-outline-shader.html
This shader uses a pass to create a slightly bigger mesh behind the original one.
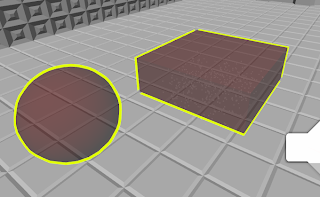
This is a good solution (at least in Unity), but only for convex/non transparent object. The fragments of the outline will indeed appear behind the mesh:
 We can remove the fragments behind the mesh modifying the depth buffer with a duplicated object.
The original object writes to the z-buffer, so the duplicated object (i.e. the one that act as an outline) will be partially culled by the original one.
In order to obtain this, we can use these shaders:
Transparent shader for the original object:
The result is pretty good:
Finally, here it is a Unity script that automatically creates the outline effect when applied to an object:
http://answers.unity3d.com/questions/141229/making-a-silhouette-outline-shader.html
This shader uses a pass to create a slightly bigger mesh behind the original one.
This is a good solution (at least in Unity), but only for convex/non transparent object. The fragments of the outline will indeed appear behind the mesh:

The original object writes to the z-buffer, so the duplicated object (i.e. the one that act as an outline) will be partially culled by the original one.
In order to obtain this, we can use these shaders:
Transparent shader for the original object:
Shader "Outline/Transparent" {
  Properties {
    _color ("Color", Color) = (1,1,1,0.5)
  }

    SubShader {
    Tags {"Queue" = "Geometry+1" }
      Pass {
        Blend SrcAlpha OneMinusSrcAlpha
        Lighting On
        ZWrite On

        Material {
          Diffuse [_color]
        }
      }
    }
}
Outline shader for the outline, it will be applied to the duplicated object (Note: this is a mod of the shader quoted at the begin)
Shader "Outline/Outline" {
    Properties {
      _OutlineColor ("Outline Color", Color) = (0,0,0,1)
      _Outline ("Outline width", Range (.002, 0.03)) = .005
    }

    CGINCLUDE
    #include "UnityCG.cginc"

    struct appdata {
    float4 vertex : POSITION;
    float3 normal : NORMAL;
    };

    struct v2f {
    float4 pos : POSITION;
    float4 color : COLOR;
    };

    uniform float _Outline;
    uniform float4 _OutlineColor;

    v2f vert(appdata v) {
      // just make a copy of incoming vertex data but scaled according to normal direction
      v2f o;
      o.pos = mul(UNITY_MATRIX_MVP, v.vertex);

      float3 norm = mul ((float3x3)UNITY_MATRIX_IT_MV, v.normal);
      float2 offset = TransformViewToProjection(norm.xy);

      o.pos.xy += offset * o.pos.z * _Outline;
      o.color = _OutlineColor;
      return o;
    }
    ENDCG

    SubShader {
    Tags {"Queue" = "Overlay"}

      Pass {
        Name "OUTLINE"
        Tags { "LightMode" = "Always" }
        Cull Front
        ZWrite On
        ZTest Less
        Blend SrcAlpha OneMinusSrcAlpha
        ColorMask RGB
        Offset 15,15

        CGPROGRAM
        #pragma vertex vert
        #pragma fragment frag
          half4 frag(v2f i) :COLOR { return i.color; }
        ENDCG
      }
    }

    SubShader {
      Tags {"Queue" = "Overlay" }
      CGPROGRAM
      #pragma surface surf Lambert

      sampler2D _MainTex;
      fixed4 _Color;

      struct Input {
        float2 uv_MainTex;
      };

      void surf (Input IN, inout SurfaceOutput o) {
        fixed4 c = tex2D(_MainTex, IN.uv_MainTex) * _Color;
        o.Albedo = c.rgb;
        o.Alpha = c.a;
      }
      ENDCG

      Pass {
        Name "OUTLINE"
        Tags { "LightMode" = "Always" }
        Cull Front
        ZWrite On
        ColorMask RGB
        Blend SrcAlpha OneMinusSrcAlpha

        CGPROGRAM
        #pragma vertex vert
        #pragma exclude_renderers gles xbox360 ps3
        ENDCG
        SetTexture [_MainTex] { combine primary }
      }
    }

    Fallback "Diffuse"
}
The result is pretty good:

Finally, here it is a Unity script that automatically creates the outline effect when applied to an object:
using UnityEngine;
using System.Collections;

public class Outliner : MonoBehaviour {

  public Color meshColor = new Color(1f,1f,1f,0.5f);
  public Color outlineColor = new Color(1f,1f,0f,1f);

  // Use this for initialization
  public void Start () {

    // Set the transparent material to this object
    MeshRenderer meshRenderer = GetComponent();
    Material[] materials = meshRenderer.materials;
    int materialsNum = materials.Length;
    for(int i = 0; i < materialsNum; i++) {
      materials[i].shader = Shader.Find("Outline/Transparent");
      materials[i].SetColor("_color", meshColor);
    }

    // Create copy of this object, this will have the shader that makes the real outline
    GameObject outlineObj = new GameObject();
    outlineObj.transform.position = transform.position;
    outlineObj.transform.rotation = transform.rotation;
    outlineObj.AddComponent();
    outlineObj.AddComponent();
    Mesh mesh;
    mesh = (Mesh) Instantiate(GetComponent().mesh);
    outlineObj.GetComponent().mesh = mesh;

    outlineObj.transform.parent = this.transform;
    materials = new Material[materialsNum];
    for(int i = 0; i < materialsNum; i++) {
      materials[i] = new Material(Shader.Find("Outline/Outline"));
      materials[i].SetColor("_OutlineColor", outlineColor);
    }
    outlineObj.GetComponent().materials = materials;

  }

}
Tuesday, March 5, 2013
Unity3D tip #01 - in-game configurable input
Currently unity doesn't provide a way to configure the commands during the game. Once the player starts the program, the command are permanently linked to the keyboard and mouse buttons. For Facade we wanted to give the player the possibility to choose the keyboard configuration from the main menu, like in any other game.
In order to do this, I've created a simple class that replaces the Input class that unity provides.
using UnityEngine;
using System.Collections;

public enum Command {
	FORWARD,
	LEFT,
	RIGHT,
	BACK,
	JUMP,
	QMENU,
	PAUSE,
	SWING_FORWARD,
	SWING_BACKWARD,
	ACTIVATE,
	CLOSE_TIP
}

public enum Axis {
	HORIZONTAL,
	VERTICAL
}

public class FInputManager : MonoBehaviour {

	static private KeyCode[] commandsArray;

	static public void SetCommands(KeyCode[] commands) {
		commandsArray = commands;
	}

	static public bool GetCommand(Command com) {
		return Input.GetKey(commandsArray[(int)com]);
	}

	static public bool GetCommandDown(Command com) {
		return Input.GetKeyDown(commandsArray[(int)com]);
	}

	static public bool GetCommandUp(Command com) {
		return Input.GetKeyUp(commandsArray[(int)com]);
	}

	static public float GetAxis(Axis axis) {
		switch (axis) {
		case Axis.HORIZONTAL:
			return (float)( -System.Convert.ToInt32(Input.GetKey(commandsArray[(int)Command.LEFT])) +
							 System.Convert.ToInt32(Input.GetKey(commandsArray[(int)Command.RIGHT])));
		case Axis.VERTICAL:
			return (float)( System.Convert.ToInt32(Input.GetKey(commandsArray[(int)Command.FORWARD])) +
							 -System.Convert.ToInt32(Input.GetKey(commandsArray[(int)Command.BACK])));
		}
		return 0;
	}

	static public KeyCode GetKeyCode(Command com) {
		return commandsArray[(int)com];
	}

}
Instead of using strings like unity does, this class uses only an enum, thus it avoid allocations of pointless strings.
The mapping between a Command and a unity KeyCode is done through the array commandsArray. This can be set through the SetCommands method (but look out from the out-of-bound errors ;) ).
Now let see how the menu and the config file works.
private ListOnce the player press the 'Save' button, the methods SaveButtonsEntry() and UpdateInputManager() are called.> buttonsEntries; // --- inside the menu loop -- if (buttonsEntriesNeedsRefresh) { buttonsEntriesNeedsRefresh = false; LoadButtonsEntry(); } // The user is inserting the new key for a command. // Capture it and save it the right button entry if (waitingForKey) { Event e = Event.current; if (e.isKey) { waitingForKey = false; buttonsEntries[entryToUpdateIndex].Item2 = e.keyCode; } } int entryIndex = 0; GUILayout.BeginHorizontal(); if (GUILayout.Button("Save")) { buttonsEntriesNeedsRefresh = true; SaveButtonsEntry(); UpdateInputManager(); menuState = MenuState.MAIN; } if (GUILayout.Button("Discard Changes")) { buttonsEntriesNeedsRefresh = true; menuState = MenuState.MAIN; } if (GUILayout.Button("Load default configuration")) { buttonsEntriesNeedsRefresh = true; CreateDefaultConfig(); menuState = MenuState.MAIN; } GUILayout.EndHorizontal(); buttonConfigScroolPosition = GUILayout.BeginScrollView( buttonConfigScroolPosition, false, true); foreach (Tuple entry in buttonsEntries) { GUILayout.BeginHorizontal(); GUILayout.Label(entry.Item1, GUILayout.Width(buttonWidth)); if (GUILayout.Button(entry.Item2.ToString(), GUILayout.Width(100))) { // The player clicked this button, so the button to be updated //is the button specified by entryIndex entryToUpdateIndex = entryIndex; // From now on we will wait for the user to press a new key. waitingForKey = true; } entryIndex++; GUILayout.EndHorizontal(); } }
private void SaveButtonsEntry() {
	System.IO.File.WriteAllText(buttonsConfig, string.Empty);
	FileInfo buttonsConfigFileInfo = new FileInfo(buttonsConfig);
	StreamWriter writer = buttonsConfigFileInfo.AppendText();

	foreach (Tuple entry in buttonsEntries) {
                // We want a KISS config file, nothing fancy
                // The first field is the name of the command,
                // the second is the string representation of the KeyCode value.
		writer.WriteLine(entry.Item1 + '=' + entry.Item2.ToString());
	}

//		writer.Flush();
	writer.Close();
}

private void UpdateInputManager() {
	System.Array commands = System.Enum.GetValues(typeof(Command));
	KeyCode[] newCommands = new KeyCode[commands.Length];
	int i = 0;
        // Search each possible value of the Command enum inside the config file
	foreach (var com in commands) {
		bool commandFound = false;
		foreach (var entry in buttonsEntries) {
                        // Again, keep it simple, nothing fancy
			if (entry.Item1.ToUpper().Replace(' ','_') == com.ToString()) {
				newCommands[i] = entry.Item2;
				commandFound = true;
				break;
			}
		}
		if (!commandFound) {
			Debug.LogError("Unable to find command '" + com + "' in the buttons configuration file");
		}
		i++;
	}
	FInputManager.SetCommands(newCommands);  // <--- data-blogger-escaped-inputmanager.="" data-blogger-escaped-pre="" data-blogger-escaped-the="" data-blogger-escaped-update="">


It is pretty easy to achieve this in C#: We can get the string representation of each enum value, thus we don't need to do any mapping between string and integers values.
Wednesday, August 29, 2012
Voxelization in Unity
A few words on Voxelization and SAT.
In this post we will create a script for voxelize any kind of mesh in unity. Voxelization could be useful in physical simulations, terrain representation and every situation where we need to manipulate the hollow inside of a mesh. A great post about Voxelization can be found here, on Wolfire blog. The post explains how the voxelization of a triangle mesh is done in Overgrowth, we will use the same method in unity.
The creation of a voxel model that reproduces the mesh is achived trough a 3d grid of cubes and an intersection test for each triangle against each cube.
The author states that he uses a AABB-AABB intersection test to check if a cube and a triangle are intersected. This is very fast and appropriate for most situations, but we want the general solution.
A slower but precise way to test the intersection is to use the Separating Axis Theorem. This paper explains the use of the SAT for Triangle-AABB intersection.
An implementation in C++ of this algorithm was written by Mike Vandelay and can be found on planet-source-code.com. I rewrote the same code in unityscript.
Basically the SAT works like this:
- Take 13 axes: 3 axes are the cube face normals, 1 axis is the triangle face normal, 9 are the dot product between the first 3 axes and the triangles edges.
- Project the AABB and the triangle on each axis. If the projections intersects on an axis, then the AABB and the triangle are intersected, otherwise they aren't.
Now, let's see how implement all this in unity.
Mesh Voxelization
 | |||
| A sphere and its voxel model in unity |
We are going to use a grid for creating a voxel model. Each Grid is formed by cubes of the same size, these are the grid properties:
public class AABCGrid {

private var side : float;
private var width : short;
private var height : short;
private var depth : short;
private var origin : Vector3;
private var cubeSet : boolean[,,];
private var cubeNormalSum : short[,,];
private var debug = false;

...
}
AABC stands for Axis Aligned Bounding Cube.
For performance purpose, I didn't add a 3 dimension array of AABCs, otherwise each cube had to store the side length, the set value etc...
However an AABC class is defined, but only for external use, while inside the AABCGrid class everything is evaluated starting from the class properties.
e.g. to obtain the vertices of a cube is it possible to use the method
AABCGrid.GetAABCCorners(x : short, y : short, z : short) : Vector3[]
or the method AABC.GetCorners().
The AABC.GetCorners() is actually defined like this:
public function GetCorners(x : short, y : short, z : short) : Vector3[] {
    // grid is a reference to an AABCGrid
    return grid.GetAABCCorners(x, y, z);
}
All the public method call a CheckBound() function that check if the cube specified by the x, y, z variable is inside the grid, then the real implementation of the method is called.
e.g.
public function IsAABCSet(x : short, y : short, z : short) : boolean {
   CheckBounds(x, y, z);
   return IsAABCSetUnchecked(x, y, z);
}

protected function IsAABCSetUnchecked(x : short, y : short, z : short) : boolean {
   return cubeSet[x, y, z];
}
Off course, inside the AABCGrid class and in the possible inheritors, only the unchecked method should be called for faster code.
Creating the voxel shell
Once the grid is defined, we need to 'set' all the cubes that are intersected by a triangle of the mesh.This is done in the AABCGrid.FillGridWithGameObjectMeshShell() method.
The result will be a voxel shell, an empty shape that reproduces the mesh.
Ignore the part relative to the normals of the triangles, I'm going to explain that later.
public function FillGridWithGameObjectMeshShell(gameObj : GameObject, storeNormalSum : boolean) {
    var gameObjMesh = gameObj.GetComponent(MeshFilter).mesh;
    var gameObjTransf = gameObj.transform;
    var triangle = new Vector3[3];
    var startTime = Time.realtimeSinceStartup;
    var meshVertices = gameObjMesh.vertices;
    var meshTriangles = gameObjMesh.triangles;
    var meshTrianglesCount = meshTriangles.length / 3;
    var x : short;
    var y : short;
    var z : short;
    var ignoreNormalRange = 0;
    // In this method we can also evaluate stores the normals of the triangles
    // that intersect the cube.
    if (storeNormalSum) {
        cubeNormalSum = new short [width, height, depth];
    }
    if(debug) {
        Debug.Log("Start:");
        Debug.Log("Time: " + startTime);
        Debug.Log("     Mesh Description: ");
        Debug.Log("Name: " + gameObjMesh.name);
        Debug.Log("Triangles: " + meshTrianglesCount);
        Debug.Log("Local AABB size: " + gameObjMesh.bounds.size);
        Debug.Log("     AABCGrid Description:");
        Debug.Log("Size: " + width + ',' + height + ',' + depth);
    }

    // For each triangle, perform SAT intersection check with the AABCs within the triangle AABB.
    for (var i = 0; i < meshTrianglesCount; ++i) {
        triangle[0] = gameObjTransf.TransformPoint(meshVertices[meshTriangles[i * 3]]);
        triangle[1] = gameObjTransf.TransformPoint(meshVertices[meshTriangles[i * 3 + 1]]);
        triangle[2] = gameObjTransf.TransformPoint(meshVertices[meshTriangles[i * 3 + 2]]);
        // Find the triangle AABB, select a sub grid.
        var startX = Mathf.Floor((Mathf.Min([triangle[0].x, triangle[1].x, triangle[2].x]) - origin.x) / side);
        var startY = Mathf.Floor((Mathf.Min([triangle[0].y, triangle[1].y, triangle[2].y]) - origin.y) / side);
        var startZ = Mathf.Floor((Mathf.Min([triangle[0].z, triangle[1].z, triangle[2].z]) - origin.z) / side);
        var endX = Mathf.Ceil((Mathf.Max([triangle[0].x, triangle[1].x, triangle[2].x]) - origin.x) / side);
        var endY = Mathf.Ceil((Mathf.Max([triangle[0].y, triangle[1].y, triangle[2].y]) - origin.y) / side);
        var endZ = Mathf.Ceil((Mathf.Max([triangle[0].z, triangle[1].z, triangle[2].z]) - origin.z) / side);
        if (storeNormalSum) {
            for (x = startX; x <= endX; ++x) {
                for (y = startY; y <= endY; ++y) {
                    for (z = startZ; z <= endZ; ++z) {
                        if (TriangleIntersectAABC(triangle, x, y, z)) {
                            var triangleNormal = GetTriangleNormal(triangle);
                            cubeSet[x, y, z] = true;
                            if (triangleNormal.z < 0 - ignoreNormalRange) {
                                cubeNormalSum[x, y, z]++;
                            } else if (triangleNormal.z > 0 + ignoreNormalRange){
                                cubeNormalSum[x, y, z]--;
                            }
                        }
                    }
                }
            }
        } else {
            for (x = startX; x < endX; ++x) {
                for (y = startY; y < endY; ++y) {
                    for (z = startZ; z < endZ; ++z) {
                        if (!IsAABCSet(x, y, z) && TriangleIntersectAABC(triangle, x, y, z)) {
                            cubeSet[x, y, z] = true;
                        }
                    }
                }
            }
        }
    }
    if(debug) {
        Debug.Log("Grid Evaluation Ended!");
        Debug.Log("Time spent: " + (Time.realtimeSinceStartup - startTime) + "s");
        Debug.Log("End: ");
    }
}
The code finds the AABB of each triangle (2), then performs the SAT intersection test on each cube intersected by AABB (3).
 |
| (1) the triangle in the grid. (2) the triangle with its AABB and the AABCs intersected by the AABB. (3) the AABCs intersected by the triangle |
Filling the hollow inside
When this method is finished, we will have a voxel model that reproduce the mesh. But we have not finished yet, we may need also to know which voxel (AABC) is inside the mesh and which is out.
In order to do that we use the scan fill algorithm like the post on overgrowth blog explains, except for a little thing: we don't start to fill the cube when the normal of the last triangle faces to the left, instead we mark 'Begin' and 'End' cubes in FillGridWithGameObjectMeshShell().
If the z component of the triangle is positive, we decrease cubeNormalSum[x, y, z] by one, else we increase it. When all the triangles have been processed, a positive cubeNormalSum means that the cube is a 'Begin' cube, if it is negative then the cube is an 'End' cube.
We can't just check the normal of the last triangle because we don't know the order of the triangles, we neither traverse the entire grid during the creation of the voxel shell.
The method FillGridWithGameObjectMesh() does the real scan lining once that FillGridWithGameObjectMeshShell() ends. It traverses all the grid, starting from the cube at 0, 0, 0.
If a 'Begin' cube is found, an 'End' cube is searched. If an 'End' cube is found, all the cubes between the last 'Begin' and 'End' are set.
public function FillGridWithGameObjectMesh(gameObj : GameObject) {
   FillGridWithGameObjectMeshShell(gameObj, true);

   for (var x = 0; x < width; ++x) {
      for (var y = 0; y < height; ++y) {
         var fill = false;
         var cubeToFill = 0;
         for (var z = 0; z < depth; ++z) {
            if (cubeSet[x, y, z]) {
               var normalSum = cubeNormalSum[x, y, z];
               if (normalSum) {
                  if (normalSum > 0) {
                     // 'Begin' cube
                     fill = true;
                  } else {
                     // 'End' cube
                     fill = false;
                     while (cubeToFill > 1) {
                        cubeToFill--;
                        cubeSet[x, y, z - cubeToFill] = true;
                     }
                  }
               cubeToFill = 0;
             }
             continue;
         }
         if (fill) {
            cubeToFill++;
         }
      }
   }
}
 cubeNormalSum = null;
}
Performance
Performance are mainly determined by the number of triangles in the mesh and the side length of the AABCs.
Here they are some of the tests made on my laptop:
Laptop specs:
HP g6-1359el
Intel Core i5-2450M - 2,5 GHz, 3 MB cache L3
AMD Radeon HD 7450M
First Test:

Mesh: construction_worker
Time spent: 0.4051636s
Triangles: 4020
Cube side: 0.05
Second Test

Mesh: construction_worker
Time spent: 1.088864s
Triangles: 4020
Cube side: 0.02
Third Test

Mesh: sphere
Time spent: 1.926165s
Triangles:760
Cube side: 0.03
Memory could be saved storing cubeSet using a 3D bitarray class and cubeNormalSum using a 3D array of bytes
Try it yourself
For testing purpose there is also a VoxelizationTest.js script on my github. Attach it to an object with a mesh to try this voxelization script. Remember to enable Gizmos in the game window, otherwise the AABCs will not appear!
Off course you can write here all your advices or questions.
Off course you can write here all your advices or questions.
Subscribe to:
Posts (Atom)